Presenting information effectively, whether in screencast videos or talking head videos, requires careful planning and organization. One key aspect of this is being able to read your notes seamlessly while maintaining eye contact with your audience. In this post, we’ll go through the process of reading notes while presenting to help you deliver engaging and professional presentations.
Setting Up Your Presentation Environment
Before we delve into the specifics of reading notes while presenting, let’s start by setting up your presentation environment. This is crucial for a smooth and distraction-free experience.
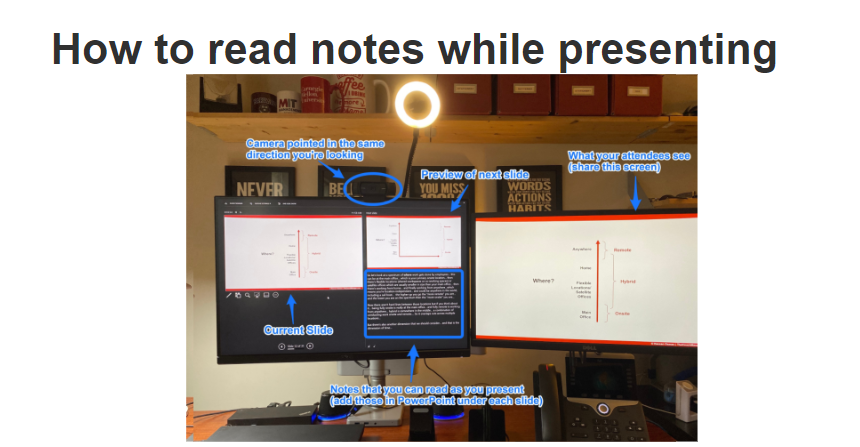
Here’s how my setup looks like for reference:

1. Utilize Dual Monitors (If Possible)
While it’s not mandatory, using two separate monitors can significantly enhance your presentation experience. Here’s how it works:
- Monitor 1 (Left): Use this monitor for your notes and reference materials.
- Monitor 2 (Right): Use this monitor to record your screen.
By splitting your setup this way, you ensure that your audience sees only the content you want to share, while you have easy access to your notes and presentation materials. If you only have one monitor, don’t worry; you can still make this work effectively.
2. Use Microsoft PowerPoint
To facilitate this setup, use Microsoft PowerPoint or a similar presentation software. Follow these simple steps:
- Open your PowerPoint presentation.
- Click on “Share.”
- Select “Full Screen.”
This will display your slides on the right monitor (which is being recorded) and your notes on the left monitor, making it easy to read your notes while presenting.
3. Benefits of This Setup
Here are some advantages of setting up your presentation environment in this manner:
- Maintain Eye Contact: With your notes directly below your camera, it appears as though you are looking at the same content as your audience, avoiding the awkwardness of appearing to read from the side.
- Preview and Current Slides: You can see both the upcoming slide and the current slide, helping you stay on track and in sync with your audience.
- Seamless Note Reading: You can read your notes effortlessly, ensuring you stay on script or use them as reference points without appearing robotic.
This setup not only improves your presentation but also streamlines the editing process, as you’ll need fewer cuts and adjustments later.
Recording and Editing Best Practices
Now that your presentation environment is optimized, let’s move on to recording and editing best practices to help you create high-quality content.
4. Record One Video at a Time
When recording your videos, tackle one at a time. This approach helps you maintain consistency in your recording settings, such as microphone levels, lighting, camera positioning, and resolution.
5. Handle Mistakes with a Pause and Clap
Mistakes happen, even to the most seasoned presenters. Instead of stopping the recording, take a long pause when you make a mistake and then clap twice. This will create a visible audio marker in your recording, making it easier to identify and edit errors later.
6. Editing and Adding Animation
After recording, edit your video to refine the content. You can cut out any unnecessary pauses, filler words (e.g., “ums” and “ahs”), and errors. If your content requires animations, consider using software like Camtasia or Final Cut Pro. Here’s a tip: for evergreen content (unchanging content), create animations in PowerPoint; for content that may evolve, use video editing software.
7. Produce and Export in MP4 Format
For Udemy courses, it’s recommended to export your videos in MP4 format. This format is widely supported and ensures compatibility with Udemy’s platform. Follow Udemy’s guidelines for resolution and other technical specifications to ensure the best video quality.
8. Watch the Video for Quality Control
Before moving on to the next video, watch the one you just recorded for quality control. This step is crucial because it allows you to catch any issues, correct mistakes, and ensure the video meets your standards.
Uploading and Organizing Your Course
Now that you’ve recorded and edited your videos, it’s time to upload and organize your course content on Udemy.
9. Upload One Section at a Time
As you create your course, organize it into sections. For instance, if you have four lectures in one section, upload all four lectures together. This approach keeps related content together and makes it easier for students to navigate your course.
10. Preview as a Student
Udemy offers the option to preview your course from a student’s perspective. Although this step is optional, it can be valuable, especially for the initial lectures in your course. Previewing as a student helps you ensure that everything appears as intended and gives a positive first impression to your audience.
If you’d like to learn more, check out “Create & Sell an Online Course on the Side” to learn how to publish bestselling courses on Udemy